This cake is all it took to get me posting again. In another attempt to eat well, I have been experimenting with "healthier" baking options to desperately try to appease my sweet tooth. This was a BIG WIN! The cake holds its own so well that it could be simply baked in a bundt pan with a powdered sugar sprinkle. I have not tried the gluten free version, but I'm sure it can be done. I highly suggest making this for your next party. It is well worth the EASY effort! I didn't even use the mixer until the icing!
Vegan Chocolate Zucchini Cake With Frosting
2 cups sugar
2 ½ cups flour
¾ cup oil
1 teaspoon salt
2 t baking soda
½ cup cocoa rounded
1 ½ teaspoon baking powder
3 T flax meal mixed in EIGHT tablespoons water
2 t vanilla
½ cup vanilla almond milk WITH 1 T white vinegar
2 cups grated or shredded zucchini
Preheat oven to 325 degrees. In a large mixing bowl, mix all the dry ingredients together. Add the wet ingredients and stir until well blended. Pour into two 9 inch baking pans, 1 13 x 9, or 1 bundt pan and cook 50 min. Cool on wire rack and glaze or sprinkle with powdered sugar to finish.
Frosting:
1 8oz tub vegan cream cheese
1/4 cup margarine
1 box powdered sugar
1/2 cup-3/4 cup cocoa powder
1 t vanilla
Almond milk if needed to moisten more
Mix cream cheese and margarine together well in mixer. Add vanilla and blend in. Add dry ingredients and slowly incorporate until combined, then whip at high speed one minute. Add almond milk if needed one tablespoon at a time.
I was on FaceBook earlier and saw that it was "National Pretzel Day," and I thought what the heck. Let's try it. I had just had a great pretzel from a food truck recently and had contemplated the task. It didn't look so hard by the recipe. I was more worried about recreating the iconic shape to at least recognizable standards than I was the actual flavor. It also makes only six, so no big loss if I screw it up, either. After reading quite a few recipes, I took what I liked best about each one and came up with this:
The PERFECT Pretzel!
And Hunter had a GREAT time helping Mommy kneed the dough!
So here's the recipe!
The PERFECT Pretzel
1 c milk
1 pkg yeast
3 T brown sugar
1 t salt
3 T unsalted butter, room temp
2 1/4 c flour plus more for kneeding
1/3c baking soda dissolved in 3 c water
PLUS your favorite dipping sauces!
To make dough: Heat milk in microwave or in saucepan to 110 degrees. Lukewarm. Whisk in yeast and let sit for two minutes. Pour into large bowl and stir in brown sugar and salt. Add one cup of flour and stir with large spoon. When well-blended, add the remaining 1 1/4c flour and stir to form a sticky dough. Turn onto floured surface, and, adding flour as necessary, kneed for five minutes. Form dough into ball and place in greased bowl and cover until doubled in bulk, about one hour.
Preheat oven to 450 degrees. Place saute pan on stove and heat 3 c water with 1/3 c baking soda. Bring to boil. Punch dough in, and, using floured surface, divide into six equal sections and roll each into 24" ropes, shaping into "pretzel" shape. Let sit for two minutes, then place each one into boiling water mixture for ten seconds on each side. Using straining spoon, drain and place on well-greased cookie sheet. Bake at 450 for 10-12 minutes. Cool on wire rack. Serve with favorite dips.
I admit this is not my "original" creation. I did find a very similar recipe on Pinterest that links to http://www.thatssomichelle.com/2012/02/bang-bang-cauliflower.html. I tried it with a few adjustments and LOVED IT! Even the hubby gobbled it down. Unfortunately it is still fried, but at least it sneaks a veggie in!
Bang Bang Cauliflower
1 head fresh cauliflower, cut into small florets
1 cup SEASONED bread crumbs
1/4 cup cornstarch
2 cup egg whites
1/2 cup milk
Generous amount of vegetable cooking oil of your choice
Chopped green onion for garnish (about 2 stalks)
Sauce
1/2 c Olive Oil Mayo
1/4-1/3 c Sriracha Sauce......or more! : )
2 tablespoon rice vinegar
3 tablespoons sugar
1. Chop green onions and set aside. Prepare sauce by combining all sauce ingredients in a small bowl and stirring until well-blended. Set aside.
2. Whisk egg whites and milk in a bowl and set aside. Place cut cauliflower into large bowl, sprinkle with cornstarch and toss. Pour breadcrumbs into a third bowl.
3. Begin heating cooking oil in a large skillet. Dip florets into egg white mixture and roll in breadcrumbs. Carefully place into hot oil and turn once after browning.
4. As florets brown, remove and place on paper towels to soak extra oil. When all are cooked, place into one large bowl.
5. Toss with sauce and green onions. Eat immediately for best flavor and texture!
There are so many dishes I make that are unplanned and just put together as they go, but this one was worth taking note to reproduce. My rotisserie chicken turned into a big, great meal with leftovers when this was done! Takes a very short time to prepare as well.
1 lb box of rigatoni, ziti, or whatever you have on hand
1 Rotisserie chicken (lemon-pepper or herbed is best), shredded (I use mostly just white meat from it)
1 bag fresh baby spinach
1 large container fresh, sliced button mushrooms
5-6 cloves garlic, minced
4T olive oil
1 small jar of marinated artichoke hearts
1 stick butter
1/3 cup flour
2 cups milk, heavy cream, or combination
1 cup shredded parmesan cheese plus more for garnish
Salt and fresh-ground pepper
In a large pot, heat water and boil pasta as directed. Set aside after straining. Keep the pasta pot for combining all at end.
Shred chicken and set aside.
In a large skillet, pour in olive oil and heat Add garlic and mushrooms and toss for two minutes. Drain artichokes and add to skillet. Toss for one minute then add entire bag of spinach and cover. It will cook down fast. As spinach cooks down, add salt and pepper to taste. As soon as spinach is cooked, fold in chicken and set aside.
In pasta pot, melt butter. Then add flour and stir in well. Begin to pour in milk slowly, thickening to suit your taste. Add the parmesan cheese and stir til blended and cheese begins to melt. Then add in the entire spinach and chicken mixture as well. When it is coated, add pasta back in and toss together. Serve immediately topped with more parmesan cheese. Enjoy!
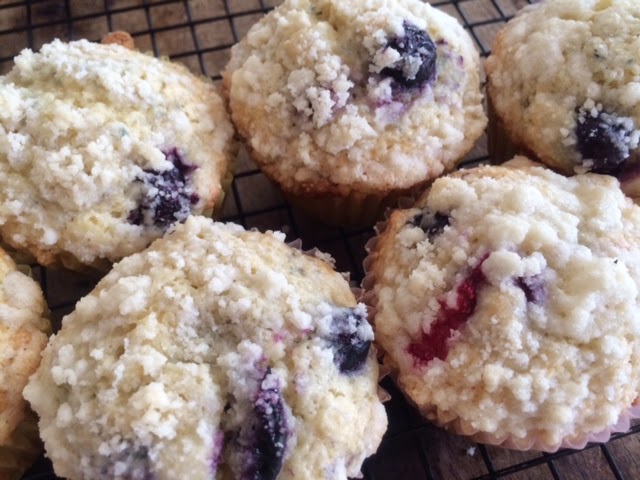
I LOVE blueberry muffins, and I am always looking to improve on my recipe. It seems like a never-ending saga of additions and subtractions. This is my best-to-date, which I am happy to make again and again. Makes about 16-18 and no need for butter. They are already buttery!
Streusel-Topped Blueberry Muffins
Muffins:
3 cups flour
1 1/2 cups sugar
3 t baking powder
1 t salt
2 large eggs
1 cup milk
1/2 cup butter, melted
2 t vanilla
1 1/2 - 2 cups blueberries to taste
Streusel Topping:
1/4 cup (4 T) cold butter
1/4 cup flour
1/4 cup sugar
Preheat oven to 375. Line muffin tins with liners. Melt butter and set aside.
Combine all dry ingredients in large mixing bowl and stir. Combine all wet ingredients in a small bowl and blend well. Add wet ingredient mixture to dry mixture and carefully stir together. When blended well, carefully fold in blueberries. Divide into muffin cups.
Combine butter, flour and sugar into a small bowl, and using fingers, blend the ingredients together until it forms a crumbly texture. Top each muffin with equal amounts using all the topping.
Bake at 375 for about 20 minutes. Will still be light colored, but will spring back when touched. Let sit in muffin tins for 10 minutes before removing.
1/4 cup cooking oil
1 Medium yellow onion, chopped
1 Green bell pepper, chopped
3 Ribs celery, chopped
2 bags veggie grounds
2 cans rotel diced tomatoes
1 can black beans
1 can chili beans in sauce
1 can red kidney beans
1/2 small can tomato paste
4 cans water (refill one of the bean cans with tap water 4 times)
3 T chili powder
1 1/2 T cumin
Salt and pepper to taste
Heat oil in large pot, I use a 5-qt cast iron pot. add the chopped veggies and cook until tender. Add the two bags of frozen veggie grounds and continue to cook until heated through. Add all the cans of tomatoes and beans, and the water. Stir in the tomato paste and spices. Simmer until veggies are very tender, about an hour.
Serve with your choice of toppings! I also eat mine with tortilla chips!
I have been wanting to try for gluten-free, vegan brownies for quite some time now, and today I just decided to go for it. I have researched tons of recipes and took my favorite parts of several to come up with this gem. I think a little frosting is great too, but these brownies stand very well on their own!
Gluten-Free Vegan Brownies
2 cups Bob's Red Mill All -Purpose Gluten-Free Flour
1/2 cup strong coffee
1 cup agave nectar
1 cup white sugar
1 teaspoon salt
2 teaspoons vanilla
3/4 cup cocoa powder
1/2 cup coconut oil
1 teaspoon baking powder
1/2 cup nuts (optional)
1/2 cup chocolate chips (optional)
Preheat oven to 325 degrees. Coat 9x13 pan with light coating of margarine.
In a medium mixing bowl, combine flour, baking soda, salt, sugar, and cocoa powder and stir. Add all wet ingredients and fold together. Add chocolate chips and nuts if using. Pour into baking dish and bake for 30 minutes. Cool on wire rack and frost if desired. ENJOY!
Frosting
1 lb powdered sugar
1/2 cup cocoa
1/2 cup coconut oil
1 teaspoon vanilla
1/4 cup (as needed) vanilla soy or almond milk
Blend dry ingredients together then add in wet. Add more milk as needed for a smooth spreading consistency. Stir until smooth then spread on brownies!
I LOVE Thai Lettuce Wraps but found the meatless ones quite bland and boring. I had to find a way to enjoy these tasty wraps in a way that complimented my new plant-based diet. After looking at several recipes already out there, I just couldn't find one that suited me. I closed the laptop and followed my taste buds. What resulted was a great first-time-try masterpiece!
I had several of the ingredients already. Just some fresh green onions and cashews completed my grocery list. I started with the brown rice first, since it takes a while to cook. I prepared the rest of the dish during that time.
What resulted was phenomenal. Even my meat-eating husband loved them!
Vegan Thai Lettuce Wraps
Simmer Sauce
1/4 Cup Gluten-Free Soy Sauce
1/4 Cup Sugar
4 T Rice Wine Vinegar
2 T Thai Style Chili Sauce
Filling
1 Bag Vegan Meal Starter (ground beef)
2 Large Portabello Mushrooms, chopped
1 Cup Cashews, Chopped
3 Cloves Garlic, Minced
2 Cups Cooked Brown Rice (About 1/2 cup rice in 1 cup water, cooked.)
1/2 Cup Green Onions, Chopped
Dipping Sauce
4 T Hoisin
4 T Thai Style Chili Sauce
1/4 Cup Gluten-Free Soy Sauce
2 T Sugar
1 Tsp Sriracha
Romaine Lettuce Leaves
Begin to cook brown rice if needed.
Prepare Simmer Sauce and set aside.
Prepare Dipping Sauce while rice is cooking as well.
In large skillet, heat 2 T oil. Put in mushrooms and stir for one minute. Add garlic and cashews and cook one minute more. Pour in bag of meatless grounds and continue to cook on medium heat until grounds are heated through. 5-7 Minutes.
Add in the two cups of cooked brown rice and stir together. Pour simmer sauce over mixture and toss to coat. Add in green onions and toss lightly. Remove from heat.
Fill Romaine Leaves with mixture. Drizzle with Dipping Sauce. Enjoy!
We just can't get enough of this salad in our house. Even though I can't claim the idea for this great recipe, I can at least share it!
Black Bean Salad
215-ounce cans black beans, rinsed and drained 1 bag frozen white kernel corn, cooked and cooled 2red bell peppers, diced 2 clovesgarlic, minced 2 minced red onion 2 teaspoonssalt 1 teaspooncayenne pepper 2 tablespoonssugar 9 tablespoonsextra virgin olive oil 6 tablespoonsfresh lime juic 1/2 cupchopped fresh cilantro, plus more for garnish 2Hass avocados, chopped Combine all ingredients except for avocados in a large bowl and mix
well. Cover and chill for a few hours or overnight. Right before
serving, add avocados and mix gently, being careful not to mash
avocados. Garnish with a more chopped cilantro if desired. Serve at room
temperature.
Original Recipe can be found at:
http://www.onceuponachef.com/2010/08/black-bean-salad-with-corn-red-peppers-avocado-lime-cilantro-vinaigrette.html
This is what makes me Wonder Woman to those who know me. The most important part of my life is starting my day with this concoction. With several variations, I don't know how I would function without it. The micronutrient punch this baby packs is the greatest part of my plant-based diet. The recipe is below as well as some of my other favorite combinations. Enjoy!
Wonder Woman Juice
2 Large Kale Leaves (or swiss chard) I prefer the organic flat-leaf kale at my local produce market
2 Cups Packed Baby Spinach
5-6 Fresh Strawberries
2 Organic Granny Smith Apples
Simple. Juice it. Drink it.
Wonder Woman Juice II
2 Large Kale Leaves (or swiss chard) I prefer the organic flat-leaf kale at my local produce market
2 Cups Packed Baby Spinach
1/2 Pint Blueberries
1 Kiwi (peel it first)
1 Organic Granny Smith Apple
Annoying Orange Juice
4 Whole Carrots
1 Golden Beet (found at my awesome local produce market!)
2 Oranges
Green Detox Queen
2 Large Kale Leaves (or swiss chard) I prefer the organic flat-leaf kale at my local produce market
2 Cups Packed Baby Spinach
2 Stalks Celery
1/2 Lemon
2 Organic Granny Smith Apples
Fruity Juicy
1/4 Whole Pineapple
5-6 Strawberries
2 Oranges
For added greatness, I pour all of this into the blender, add in a banana, and turn it into a smoothie!
All-We-Need-Now-Is-Vodka V8
2 Large Beefsteak Tomatoes (or About 5-6 Roma Tomatoes)
2 Carrots
2 Stalks Celery
1/2 Medium-Sized Cucumber
1 Wide Strip of Bell Pepper (I like red)
1 Tsp Season Salt (optional)
I have been experimenting for months with this recipe, and it is finally where I want it. Rich yet fluffy, these pancakes pack a great dose of healthy while sharing a great dose of fun. Hunter is the pickiest eater I have ever seen, yet he shovels these babies down. Just a little syrup and they're good to go!
Gluten-Free Vegan Banana Pancakes
2 cups Bob's Red Mill Gluten Free All Purpose Flour
2 tsp Baking Powder
1 tsp Baking Soda
1/2 tsp Salt
1 Tbsp Flax Meal mixed with 3 Tbsp Water (let it soak for five minutes first)
1/2 cup Melted Earth Balance Margarine
1/3 cup Honey (or agave nectar)
2 Medium Bananas, Mashed
1 cup Vanilla Almond, Coconut or Soy Milk
Place all dry ingredients in a medium mixing bowl and stir together well. Add all wet ingredients and mix with spoon until just blended. Cook just like you would regular pancakes. Lower temp is best for these.
This was a BIG win for me! I have never even had a sugar cookie that was gluten-free or vegan that I really liked, but after quite a few fails and near-misses, I think I finally nailed this one. They were a huge hit at the office with vegan and non-vegan eaters alike. Hope you enjoy!
Gluten-Free, Vegan Sugar Cookies
1/2 c Earth Balance Margarine
1/4 c Vegan Cream Cheese
1/2 c agave nectar
1/2 c organic sugar
2 T flax meal (soaked for 10 min in 6T water)
2 t vanilla
1 c coconut flour
2 c Bob's Red Mill Gluten-Free All-Purpose flour
2 t baking powder
1/2 t salt
Blend all wet ingredients in mixer. Add dry and blend well. Roll into cylinder shape, wrap in parchment paper and refrigerate at least one hour or even over-night. Preheat oven to 400. Slice dough into 1/4 inch slices and place on parchment-lined cookie sheet. Bake for ten minutes. Cool on wire racks. Ice!
Icing
1/2c Earth Balance Margarine
2T Karo light syrup
1 t vanilla
1 t butter flavoring
1/4 c vanilla almond (rice, coconut or soy) milk
1 lb powdered sugar (1 box)
Place wet ingredients into blender and pulse until creamy. Add powdered sugar by thirds. Spread on cooled cookies.
Another win with the new baking style. After a lifetime of butter, sugar, flour and eggs, gluten-free and vegan baking are a whole new experiment in baking chemistry. There have been a LOT of fails, but more wins have been occurring lately. Looks like I'm getting my new baking wings!
Gluten-Free, Vegan Carrot Muffins
1 1/2 c spelt flour
1/2 c coconut flour
2 t baking soda
1/2 t salt
1 1/2 t cinnamon
1 t nutmeg
1/2 c honey
1/2 c brown sugar
2 T flax meal soaked in 6 T water for 10 min
1/2 cup melted Earth Balance Spread
1 c vanilla almond, coconut, or soy milk
1 c finely grated carrots
1/2 c raisins
1/4 c chia seeds (optional)
Preheat oven to 350 degrees.
Mix flax meal with water in small cup and set aside to soak. Line 12 muffin tins with paper muffin cups. Place dry ingredients in medium-sized mixing bowl and stir together. Add wet ingredients and stir until combined. Finally, gently fold in carrots and raisins. Full muffin cups about 2/3 full with batter and bake for about 22-24 minutes. Cool for 5 min in tins before removing to cool on wire racks.
So much has happened since I began this blog. I have gone back to work, moved across the country, had a child diagnosed with autism, and changed my diet dramatically.
With such a hectic schedule of work, school, therapy, and motherhood, I hardly have a minute for myself, but I have found so much relief and benefit from reading posts from other moms like me that I felt compelled to throw in my two-cents here and there. Hopefully my recipes and anecdotes will make a difference to others out there.
I have been smart enough to at least write down MOST of my successful recipes. Moving from trying to eat healthy to a full plant-based diet hasn't been easy, but I often attribute my healthy diet as the difference in what keeps me going. I will be continually trying to post updates as I learn y way through this new food world and try to sneak some of these great nutrients into my picky son's diet as well.
Stay tuned......
1 cup unsalted butter, softened
2 cups sugar
1 T lemon zest
1/4 cup lemon juice
2 large eggs plus three large egg yolks
2 1/2 cups flour
1/2 t baking powder
1/2 t baking powder
1 t salt
1 cup buttermilk
1 small can frozen lemonade concentrate, thawed
1 18 oz jar raspberry preserves or jam
Fluffy Boiled Icing (recipe follows)
Preheat oven to 350 degrees. Line muffin pans with paper or foil cups (makes 24).
Combine butter and sugar in mixing bowl and blend until fluffy. Add lemon zest, juice, and eggs and mix well. Add dry ingredients slowly, blending well. Slowly pour in buttermilk until completely combined. Spoon into muffin tins, filling each about 2/3 of the way.
Place in oven and bake 20-25 minutes until light golden. Remove from pans and cool on wire rack.
When cool, shake can of thawed frozen lemonade mix and pour half into small bowl. Using a pastry bruch, glaze each cupcake with the mixture, going over twice to absorb. Let sit about an hour.
Using a wooden spoon with a thick, round handle, poke holes into the center of each cupcake. Stir raspberry preserves to loosen and scoop into pastry bag fitted with coupler only. Place tip of bag into each hole and squeeze slightly until cupcake very slightly expands. Wipe off any excess filling.
Fluffy Boiled Icing
This recipe is also on the Wilton website. It is a perfect touch for cakes that just need that extra sweet something to really set them off without tampering with the flavor too much. Also, it has no shortening or butters, keeping the fat content a little lower than with traditional icings.
3 Tablespoons meringue powder
1/2 cup cold water
2 cups sugar
1/4 cup corn syrup
1/2 cup water
Combine meringue powder and cold water in a mixing bowl and whip until stiff peaks form, about four minutes. In a saucepan, combine sugar, corn syrup and water under medium high heat. Cook and stir until it comes to a boil and set aside to cool for 1-2 minutes. Slowly pour into meringue mixture while beating. Continue to whip until glossy and stiff, about four minutes. Tint using mixer if desired.
Easiest to place in pastry bag with no tip and pipe onto cupcakes. Very light and fluffy!
Of all the cakes I make, this is by far the lost labor intensive and DELICIOUS. I found this recipe on line but changed a few things to suit my flavor preferences...who likes following directions anyway!
Tiramisu Cake
For the cake layers:
2 cups cake flour
2 teaspoons baking powder
1/2 t baking soda
1/4 t salt
1 1/2 sticks unsalted butter, room temperature
1 cup sugar
3 large eggs
1 large egg yolk
1 1/2 t pure vanilla extract
3/4 cup buttermilk
For the espresso extract:
2 tablespoons instant coffee
2 tablespoons boiling water
For the espresso syrup:
1/2 cup water
1/3 cup sugar
1 T Kahlua
For the filling and frosting:
1 8-ounce container mascarpone
1/2 cup confectioners’ sugar
1 1/2 t pure vanilla extract
1 T Kahlua
1 cup cold heavy cream
Chocolate-covered espresso beans, for decoration (optional)
Cocoa powder, for dusting
Getting ready:
Preheat oven to 350 degrees. Grease and flour two 8 inch pans.
To make the cake:
Beat together butter and sugar until smooth. Add vanilla and eggs and beat well. Add dry ingredients and mix until blended. Slowly add in buttermilk and mix until blended. Pour evenly into the two baking pans.
Bake for 28 to 30 minutes or until toothpick comes out clean.
To make the extract:
Stir the espresso powder and boiling water together in a small cup until blended. Set aside.
To make the syrup:
Stir the water and sugar together in a small saucepan and bring just to a boil. Pour the syrup into a small heatproof bowl and stir in 1 tablespoon of the espresso extract and the liqueur or brandy; set aside.
To make the filling and frosting:
Put the mascarpone, sugar, vanilla, and liqueur in a large bowl and whisk just until blended and smooth.
Working with the stand mixer with the whisk attachment or with a hand mixer, whip the heavy cream until it holds firm peaks. Switch to a rubber spatula and stir about one quarter of the whipped cream into the mascarpone. Fold in the rest of the whipped cream with a light touch.
To assemble the cake:
If the tops of the cake layers have crowned, use a long serrated knife and a gentle sawing motion to even them. Place one layer right-side up on a cardboard round or a cake plate protected with strips of wax or parchment paper. Using a pastry brush or a small spoon, soak the layer with about one third of the espresso syrup. Smooth some of the mascarpone cream over the layer – user about 1 1/4 cups – and gently press the chopped chocolate into the filling. Put the second cake layer on the counter and soak the top of it with half the remaining espresso syrup, then turn the layer over and position it, soaked side down, over the filling. Soak the top of the cake with the remaining syrup.
For the frosting, whisk 1 to 1 1/2 tablespoons of the remaining espresso extract into the remaining mascarpone filling. Taste the frosting as you go to decide how much extract you want to add. If the frosting looks as if it might be a little too soft to spread over the cake, press a piece of plastic wrap against its surface and refrigerate it for 15 minutes or so. Refrigerate the cake too.
With a long metal icing spatula, smooth the frosting around the sides of the cake and over the top. If you want to decorate the cake with chocolate-covered espresso beans, press them into the filling, making concentric circles of beans or just putting some beans in the center of the cake.
Refrigerate the cake for at least 3 hours (or for up to 1 day) before serving – the elements need time to meld.
Just before serving, dust the top of the cake with cocoa. I cut a star shape out of waxed paper and placed it lightly over the cake, and shaved a layer of chocolate over it with a microplane, before carefully removing the star to leave a stenciled shape.
1 1/2 lb fresh shrimp, peeled
2 T vegetable oil
2 cans petite diced tomatoes
1 can tomato sauce
1 med onion, chopped
1 med green bell pepper, chopped
2 large celery stalks, chopped
3 cloves garlic, minced
1 T cajun seasoning blend
1 t chili powder
Salt and pepper
1 T worcestershire sauce
1 T hot sauce (Louisiana is best), Optional
Cooked rice and garlic bread
Peel and rinse shrimp. Set aside. Chop all veggies and get rice cooking.
Heat vegetable oil in large skillet or wide sauce pan. Add onion, celery, pepper and garlic and cook about 7 minutes until softened. Add tomatoes and spices. Stir well and simmer for about 20 minutes. Add shrimp and cook just until they turn pink.
Serve over rice and with garlic bread. Enjoy!
I had an excellent Easter weekend so far business-wise. I made several pastries and even cookies with the kids in the park. I just added these pics to my cake gallery as well. The only bad thing about all these sweets is I didn't make enough to have a drop of leftovers! Maybe a blessing in disguise.
Carrot cake cupcakes with cream cheese frosting.
Vanilla cake with buttercream icing. Max and Ruby cake.
Easter cupcakes. Vanilla cake with buttercream icing.
This was one of the best last minute throw-togethers I have ever done. We ate it for three meals, and even Hunter liked it! When I cook it again, I am going to spice it up a little more.
Chicken Fried Rice
Chicken:
3-4 Boneless, skinless chicken breasts, chopped into small pieces
2 T soy sauce
2 T corn starch
Ground black pepper
2 T vegetable oil
Sauce:
1/4 c soy sauce
2 T rice wine vinegar
1 t brown sugar
Rice and Veggies:
6 cups cooked rice (or two bags of boil-in-bag rice, cooked)
3 large eggs
1/2 lb bag shelled edamame
1 large carrot, diced
1 medium onion, chopped
2 cloves garlic, minced
1/4 inch of minced ginger
2 T vegetable oil
Start cooking the rice. Prepare chicken by chopping into small pieces and tossing with soy, starch and pepper. Heat oil in very large skillet. Cook chicken until cooked through and remove to separate bowl.
In same skillet, add 2 T more oil and crack eggs into skillet. beat as they cook to blend yolks and whites. Add onions, garlic and ginger and cook for 3 minutes with eggs. Add vegetables and continue cooking for 7 minutes. Add rice and sauce and cook for five minutes. Add chicken back to pot, turn off heat and cover for five minutes.
Serve with Sriracha!